Saving iTunes Music Store Videos in Windows
Update: Please note that iTunes' methodology has changed with the release of iTunes 5.0. What little information I have on the new version has been logged on a new post, Saving Music Videos in iTunes 5.0 for Windows. Please contribute, especially if you know how to open QuickTime Cache (.qtch) files.
As a self-professed digital packrat, I can't stand the thought of ever losing some piece of information or media. I download, I checksum, I archive, I store for all eternity. I do not like to be at the mercy of others, and I positively sweat at the prospect of having some previously-available datum taken away from me. So when I couldn't save music videos from the iTunes Music Store (aka iTMS), I got a little agitated.
Saving these videos under Mac OS X is practically trivial. Step to the other side of the fence, and you're in a world of pain:

The cached videos themselves are easy enough to find:
C:\Documents and Settings\<user>\Local Settings\Temp\ contains a
".tmp" file for the currently-playing video. iTunes maintains an
exclusive lock on this file, and other programs are not allowed to read
the file in any way. This means no opening, no copying, nothing. Well,
not quite nothing. (Did you forget who you're talking to here?)
I'll start from the beginning. Here is the iTunes Music Store's Music Video section:
Further clicking brings the user to the videos themselves:
At this point, the video is saved in the Temp directory mentioned above:
But, as I mentioned, it's seemingly impossible to copy the file:

"Seemingly impossible" is not the same as "extra mega impossible," though. Studious hackers will remember the Windows Backup Utility, located in Start Menu → Programs → Accessories → System Tools → Backup. (Windows XP Home users will need to install this application.) This tool has a "shadow copy" backup function that backs up locked files, allowing backups to take place while the computer is in use. A little misappropriation, and this music video will be liberated.
You'll notice that you can't selelct a single file to back up. The default file exclusion patters for the Backup Utility prevent this. To change this setting, select "Options..." from the "Tools" menu, and click on the "Exclude Files" tab. Scroll down to the rule about files in the Temp directory, select it, and click "Remove." (This amount of destruction is OK for me, since I use the utility for archiving music videos and nothing else.)
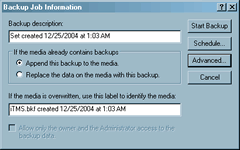
Start the backup using the default settings:
At this point, you can start doing other things in iTunes. Backup Utility has a death grip on the file, and it will be backed up. The progress bar should be well on its way:
And restore the file back to your drive using the newly-created backup file. I haven't included all the steps for the restore process. I'm sure you can figure it out. I prefer restoring to the Desktop, myself.
After the restore, give the file a .mov suffix so it's associated with QuickTime Player. You now have a nice, clean video with which to do as you please:
Remember: as we learned in Spider-Man, "with great power comes great responsibility." Apple made this hard for a reason: they don't want people throwing around all this copyrighted media willy-nilly. I can't control what you do with this information, but please support the artists as well as Apple's Music Store. Lord knows I do.
Speaking of the Lord, Happy Birthday, Baby Jesus. This is my Christmas present to all you anonymous Internet folk. Enjoy.
Updates to this post:
- March 23, 2005: Added note about renaming *.tmp file.
- April 6, 2005: Added file exclusion list information. Added link to Microsoft's site on installing Backup Utility. Confirmed that this process works in iTunes 4.7.1.


